


I JUST caught up on editing!! YAY!
I'm not really sure what to do with myself.
It's the first time since Christmas I haven't had sessions to edit.
That will change shortly, so for now, I'm going to catch up on some blog posts I've been wanting to share.
***
I always get into the crafting spirit just before Christmas.
It's fun to have hand-made gifts to give, so I was excited when I came across this post on my friend Amanda's blog!
I'd seen candy caddies before on Ashley Ann's blog. She IS my blogging/crafting idol. I want to be her when I grow up =)
So when I saw that Amanda had just made some,
I couldn't wait to alter some Starbuck's drink caddies for Christmas gifts!
(these will work with any type of glass bottle sold in a caddy-jones soda, starbucks, etc.)

My candy caddies had a {peace, love & joy} theme.
I used non-Christmas colors, so that the ladies I gave them to could use them as "craft caddies" later.
I was thinking once the M&M's were gone, they could hold buttons, stickers, ribbon, etc.
If you need a Valentine's gift idea, these would be super cute in a red, white & pink theme!!
I started the process with a couple packs of Starbucks Frappucino.
Good thing my hubby can chug these, because I started this project about a week before I needed to gift them.
He had to finish of eight bottles for me.
Once the bottles were empty, I peeled off the labels, washed them in hot soapy water, and let them air dry overnight.
Before decorating the bottles, I shot the inside of them with a hair dryer, to make sure every last drop of water was out.
Then I covered the caddy with patterned scrapbook paper
(my brown & blue paper came from Walmart)


I like to keep things easy, so I used the same pattern on all sides of the caddy.
I applied it in two pieces that folded around one corner, so that each covered two sides.

I was thrilled when I realized the center of my caddy was solid brown.
Yay, no measuring or covering needed!
I don't have a stinkin' circle cutter, so I found a plastic toy in Barrett's play-dough kit that was the perfect size, and traced around it to cover my bottle lid tops.
Yay, no measuring or covering needed!
I don't have a stinkin' circle cutter, so I found a plastic toy in Barrett's play-dough kit that was the perfect size, and traced around it to cover my bottle lid tops.


I use Zip Dry for all my paper projects. Because...it's the bomb. period.
Once the caddy was covered, I layered some other patterned paper to decorate two of the sides.
My stickers were custom designed by myself, but you could easily create something on the computer or purchase stickers to use.
OR, I'd be happy to make some for you!
Once the caddy was covered, I layered some other patterned paper to decorate two of the sides.
My stickers were custom designed by myself, but you could easily create something on the computer or purchase stickers to use.
OR, I'd be happy to make some for you!


Finally, I tied ribbon to the top of the caddy, and then added a sticker to each of the bottles.


The final project....


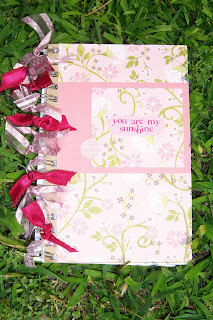
 I covered the plywood with a pink and brown floral paper, then used an empty white picture frame for the center where the clock face would be, and tied coordinating ribbons all around it. Inside the frame I used a bronze metallic finish paper. On the edges of the clock, I used a pink and brown polka dot ribbon to cover up the plywood.
 After...turned it into a recipe box! It could also be used to sort and hold pictures